PRC-PALM-SPC-5.51-pro1: BLOOD SPECIMEN COLLECTION (Print here)
1. Patient Registration
Patients must first register at the front desk prior to having their blood drawn. HFH patient orders are placed in electronic medical record (EMR) – EPIC and all orders walked in during the registration process.
2. Requisition form/Bar Code Label
The laboratory request form should contain the following information:
- Patient’s full name
- Patient’s medical record number
- Patient date of birth
- Sex
- Patient address
- Patient phone number
- Doctor’s name, code, address, phone, fax:
- ICD10 code
- Date
- Tests ordered
The laboratory ensures that specimens are ordered by authorized persons. In the HFH laboratories orders cannot be entered without a numeric provider code for HFHS providers.
Requisitions from non-HFHS providers are managed through Henry Ford Medical Laboratories (Outreach), excluding WYH, HFHC-BRN, MCT and WBH -all orders are registered through EPIC. [See PRC-PALM-5.3-pol: Requests for laboratory testing and agreements for outreach or reference testing service policy].
3. Patient Identification
The phlebotomist’s role requires a professional, courteous, and understanding manner in all contacts with the patient. Greet the patient and identify yourself and indicate the procedure that will take place. Effective communication – both verbal and nonverbal – is essential.
Proper patient identification is MANDATORY. Proper identifiers include full name (binomial name) and numeric identifier. The phlebotomist must ask the patient or a responsible person accompanying the patient to provide the patient’s full name and a numeric identifier (i.e.: birth date, MRN #) prior to specimen collection.
4. Specimen Collection
Proper hand hygiene which includes proper hand washing/antiseptic hand-rub and proper use of gloves with every phlebotomy is to be followed.
- Wash hands using foam antiseptic hand-rub or antiseptic soap and water. Gather all appropriate materials needed for the venipuncture (Vacutainer tubes, needles, gauze, etc.).
- Apply clean non-latex gloves and select appropriate gauge needle needed for this venipuncture
- Select arm for venipuncture and apply clean tourniquet. A tourniquet is used to increase venous filling and makes the veins more prominent and easier to enter. Never leave the tourniquet on for longer than one (1) minute. To do so may result in either hemoconcentration or a variation in blood test values. These conditions can be avoided by releasing the tourniquet after a preliminary study of the veins has been made.
- Ask the patient to make a fist. A closed hand causes the veins to become more prominent and easier to enter. Avoid pumping of the fist and a “tight” fist these may cause hemoconcentration of the blood.
- Select the vein site.
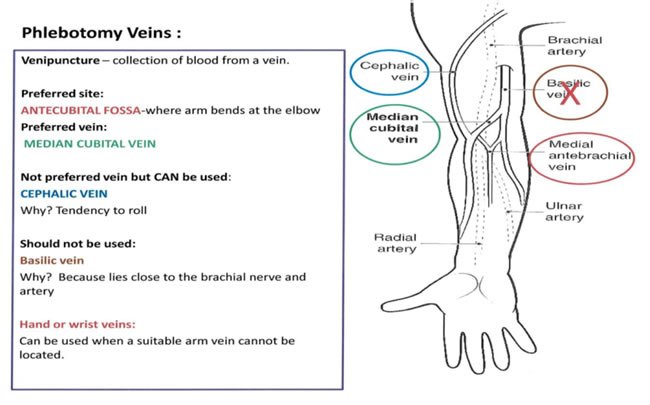
The selection of a vein site must be done properly. Veins provide an avenue of entry for various therapeutic agents as well as blood transfusions. Therefore, it is important to select the vein site carefully to preserve vein viability.

Wrist veins: proceed with caution when drawing from this area. Use this site only as one alternative when recommended venipuncture sites are unavailable. Possible nerve damage can occur when drawing at wrist; symptoms include: shooting pain, severe or unusual pain, tingling or numbness, onset of tremor.
- Palpate the veins several times with the index finger.
- Look, feel for the paths of the veins.
- Arteries are more elastic than veins and have a thick, rough wall.
- Veins do not pulsate; arteries do.
- Venous blood is dark, arterial blood is bright red.
- Select the most suitable vein.
- The median cubital and the cephalic veins are used more frequently since they are larger, fuller, and remain fixed.
- If a suitable vein is not readily apparent after the tourniquet has been applied, consider the following:
- Massage the arm from the wrist to elbow to allow blood to be forced into the vein.
- Remove the tourniquet and instruct the patient to place arm over chair in a “hanging” position.
- If necessary, remove tourniquet and apply a warm, wet cloth or towel to the site for five or ten minutes. The heat will dilate the vein.
Factors to consider when selecting a vein.
- Past conditions
- Burns, scars and sclerosed areas should be avoided.
- Mastectomy – avoid drawing the specimen from the side on which a radical mastectomy was performed due to lymphostasis. Double mastectomy requires physician notification for appropriate phlebotomy collection.
- Present conditions
- Hematoma – if unable to find another site, draw specimen from a site distal to the bruised area. Hematomas may cause abnormal test results.
- Intravenous fluids – draw the blood sample from the opposite arm or from an available site below the IV if other arm is not accessible.
- Blood transfusion – to obtain a more accurate sample, it is best not to draw a blood specimen from a patient who has received blood until 2-4 hours after the transfusion.
- Cannula fistula, or any vascular graft – blood specimens are not to be drawn from arms containing a cannula, fistula, or vascular graft.
- Edematous extremities.
5. Prepare the site for venipuncture
Antiseptic options Include: 70% isopropyl alcohol, 2% tincture of iodine, Chlorohexidine (CHG) swabs or one step
Cleanse the venipuncture site –Determine antiseptic to be used and prep area by cleansing the site using a bank-and-forth motion. After cleansing, the site should be allowed to air dry completely. Never blot with gauze or tissue and never fan or blow on the area.
Notes:
2% tincture of iodine
- Prepping of area, allow iodine to completely dry, if not allowed to dry may falsely increase levels of potassium, phosphorus or uric acid in laboratory testing
Ethanol Testing / blood cultures on children 6 months of age or younger draws
- Use 2% tincture of iodine
Blood cultures
- Chlorohexidine (CHG) swabs or one step (Do not use on children 2 months of age or younger)
- 2% tincture of iodine
- Gauze or cotton balls
Children 2 months of age or younger
- Do not use Chlorohexidine (CHG) swabs or one step
6. Venipuncture
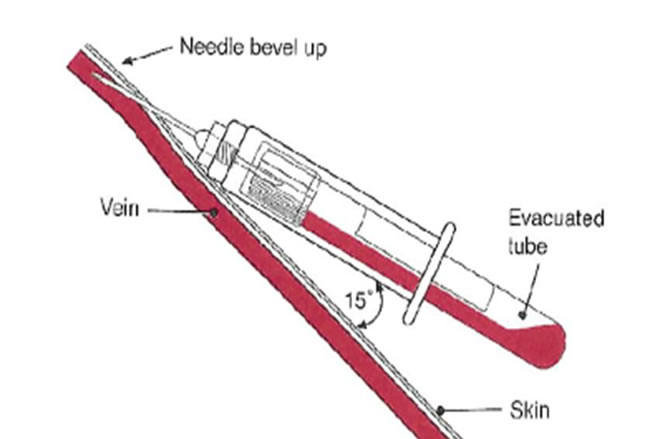
Grasp the patient’s arm firmly using your thumb to draw the skin taut and anchor the vein. The needle should form a 15 – 30 degree angle with the surface of the arm with the beveled side up. Swiftly insert the needle through the skin and into the lumen of the vein. Avoid trauma and excessive probing.

- When the vein is entered, withdraw the desired amount of blood, interchanging tubes for required tests as needed. (See proper order of draw on page 8.)
- Ask the patient to open his/her hand, then release the tourniquet.
- Remove the needle from the patient’s arm using a swift backward motion.
- Apply gauze or cotton ball over the venipuncture site using adequate pressure to avoid formation of a hematoma.
- Push safety sheath over the needle before placing the needle with holder in the appropriate sharps container.
- All patients should be checked for bleeding prior to applying a band aid/coban. The patient should be instructed to keep band aid/coban on for at least 20 minutes.
When bleeding fails to stop:
- Apply pressure to the site until bleeding stops.
- Wrap the gauze or cotton tightly with coban.
- Instruct the patient to leave on for 20 minutes after venipuncture.
The phlebotomist should be alert to excessive bleeding. If bleeding persists longer than 5 minutes, immediately notify supervisor or provider.
Label all tubes immediately at blood drawing station in the presence of the patient using two patient identifier protocol.
Place tech code, time, and date on tubes. (Place on requisition form, if applicable.)
Clean work area. Discard tourniquet, paper, extra cotton balls, and other items in the regular
trash. Remove gloves and wash hands with foam antiseptic hand-rub or antiseptic soap.
|


